Should you switch to natural deodorant before your wedding? A breakdown of transitioning to natural deodorant

Natural deodorant has been around for years, but I've noticed a huge uptick recently in people ready to make the shift! It has been on my mind for a while, and for a while I mean about 13 years. My step-mom is a breast cancer survivor and since she went through the experience, natural deodorant has been on my to-do list (continue reading for the "why").  But when is the right time to make the switch? Would it be okay to do before your wedding? This post walks you through my experience switching to natural deodorant and my recommendation for when to make the switch.

Why to switch

I'm not a super smelly or sweaty person.... or so I thought. I had been using a regular solid antiperspirant stick for years. It worked very well, but, the main active ingredient was aluminum

Why do regular antiperspirants use aluminum? It blocks the sweat glands, preventing sweat from coming out. [Sweat itself doesn't smell, but when it interacts with bacteria on the body, it can create an odor. This is why depending on who you are- you may be more or less smelly. Different types of bacteria thrive on different skin types. This is also why good hygiene is key. Shower, people!] But what is the issue with aluminum? From Cancer.org: 

"Some research suggests that aluminum-containing underarm antiperspirants, which are applied frequently and left on the skin near the breast, may be absorbed by the skin and have estrogen-like (hormonal) effects.

Because estrogen can promote the growth of breast cancer cells, some scientists have suggested that the aluminum-based compounds in antiperspirants may contribute to the development of breast cancer. In addition, it has been suggested that aluminum may have direct activity in breast tissue."

That being said, it is important to note that no studies have confirmed that aluminum could increase breast cancer risks. Another doozy that has been associated with aluminum products - Alzheimers! Again, there has been no scientific evidence proving there is any link. However, the way I see it is science is fickle, studies are often flawed (anyone who has ever paid attention to nutrition studies are super aware of this!), and there is always new data emerging. I would rather be safe than sorry! Thus the search for the perfect natural deodorant commenced. 


My experience 

First, let's talk about the fact that everyone is different, and my experience may be different than yours. But, switching to natural deodorant has been a bit of a struggle for me. 

So far I have tried 3 different varieties of natural deodorant. And the key operating word is deodorant - not to be confused with antiperspirant. As stated above, antiperspirants block the sweat from coming out, deodorant just masks the smell. And that is a big change to get used to.

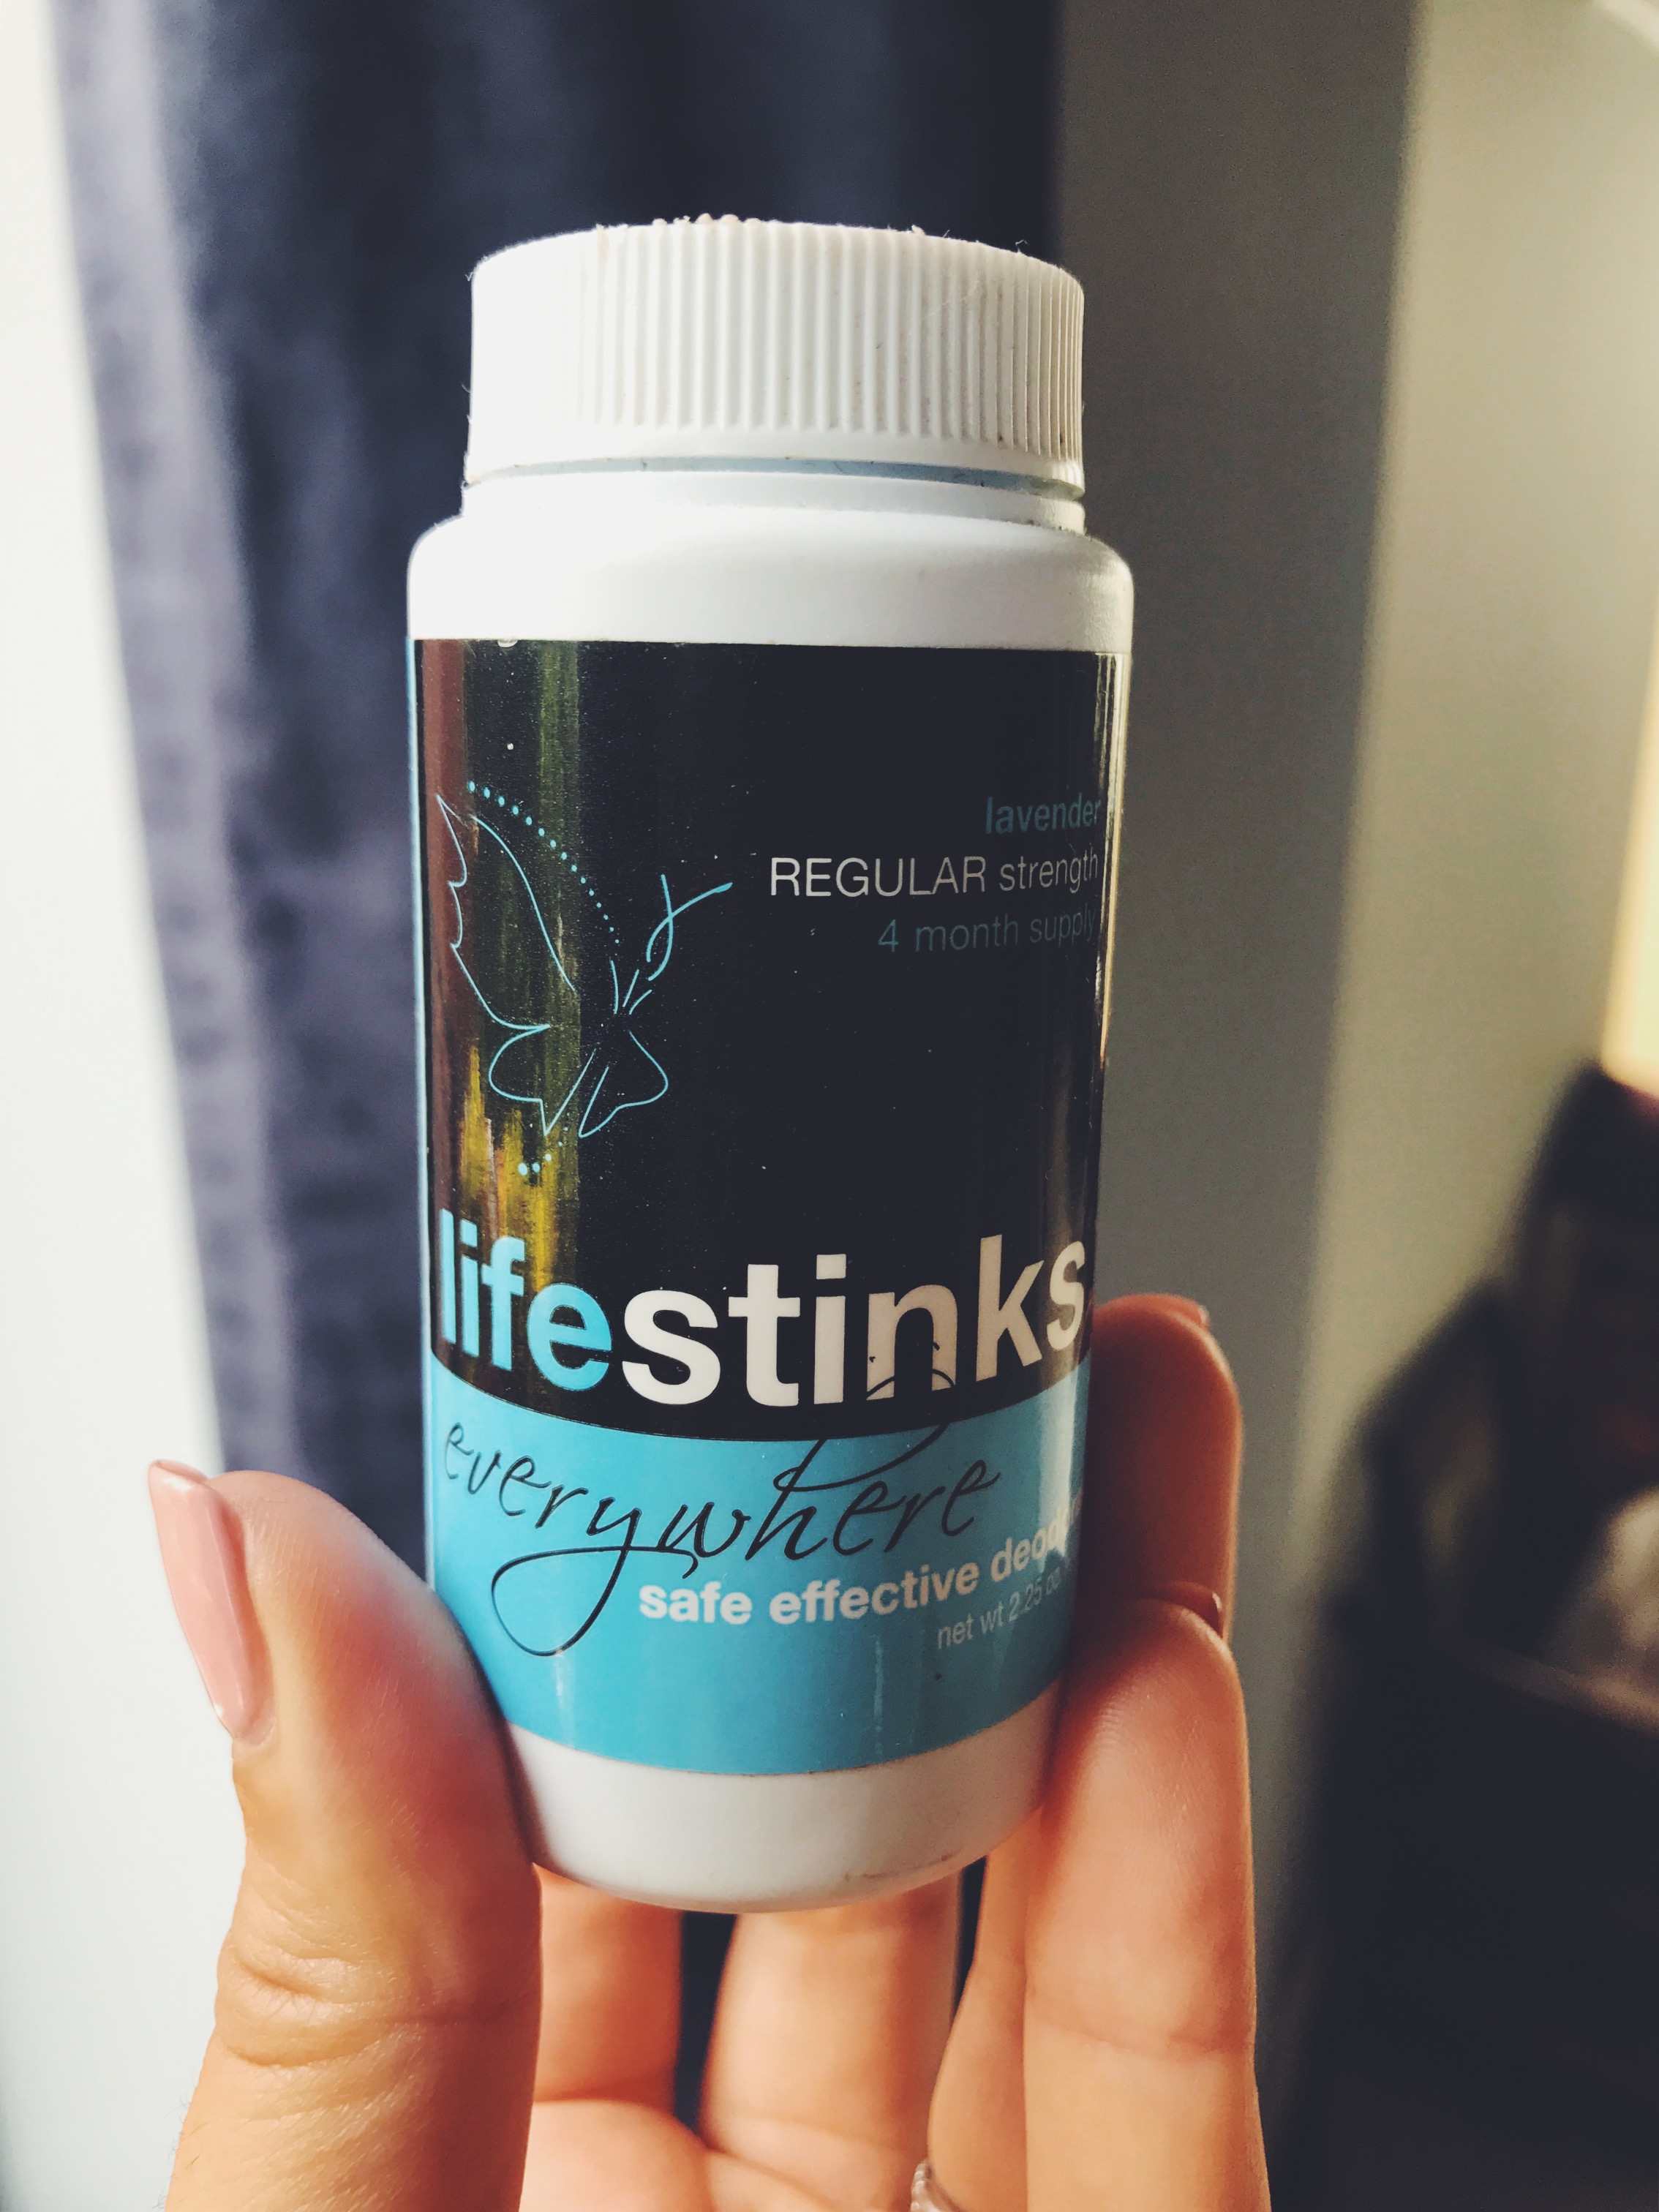
Option 1: Life Stinks

life stinks natural deodorant what to expect when you transition to natural deodorant

The first has been in my beauty bag for years. It's called Life Stinks by the Duggan Sisters. They are a small, local (yay!), Chicago business. It comes in a powder that smells like lavender or cedar. You can also purchase a "Stink Stick" that you put on first if you are a heavy sweater. I tried it for awhile years ago, but couldn't make the commitment. Mostly, I felt like I sweat much more compared to my normal antiperspirant (which isn't a knock on them, just the nature of the beast). I gave it a shot again recently when I started testing out natural deodorants.  At the end of the day, I'm just not into the powder, but it is purely personal preference. I throw it in my gym bag and will put it on post sweat to help absorb the moisture, but not for daily use. I like the feeling of putting on a stick. It is closer to my original routine and is an easier transition. Ingredients: aluminum free sodium bicarbonate, tea tree oil and lavender or cedarwood oil

Option 2: Dear Me

Dear Me Organic Deodorant

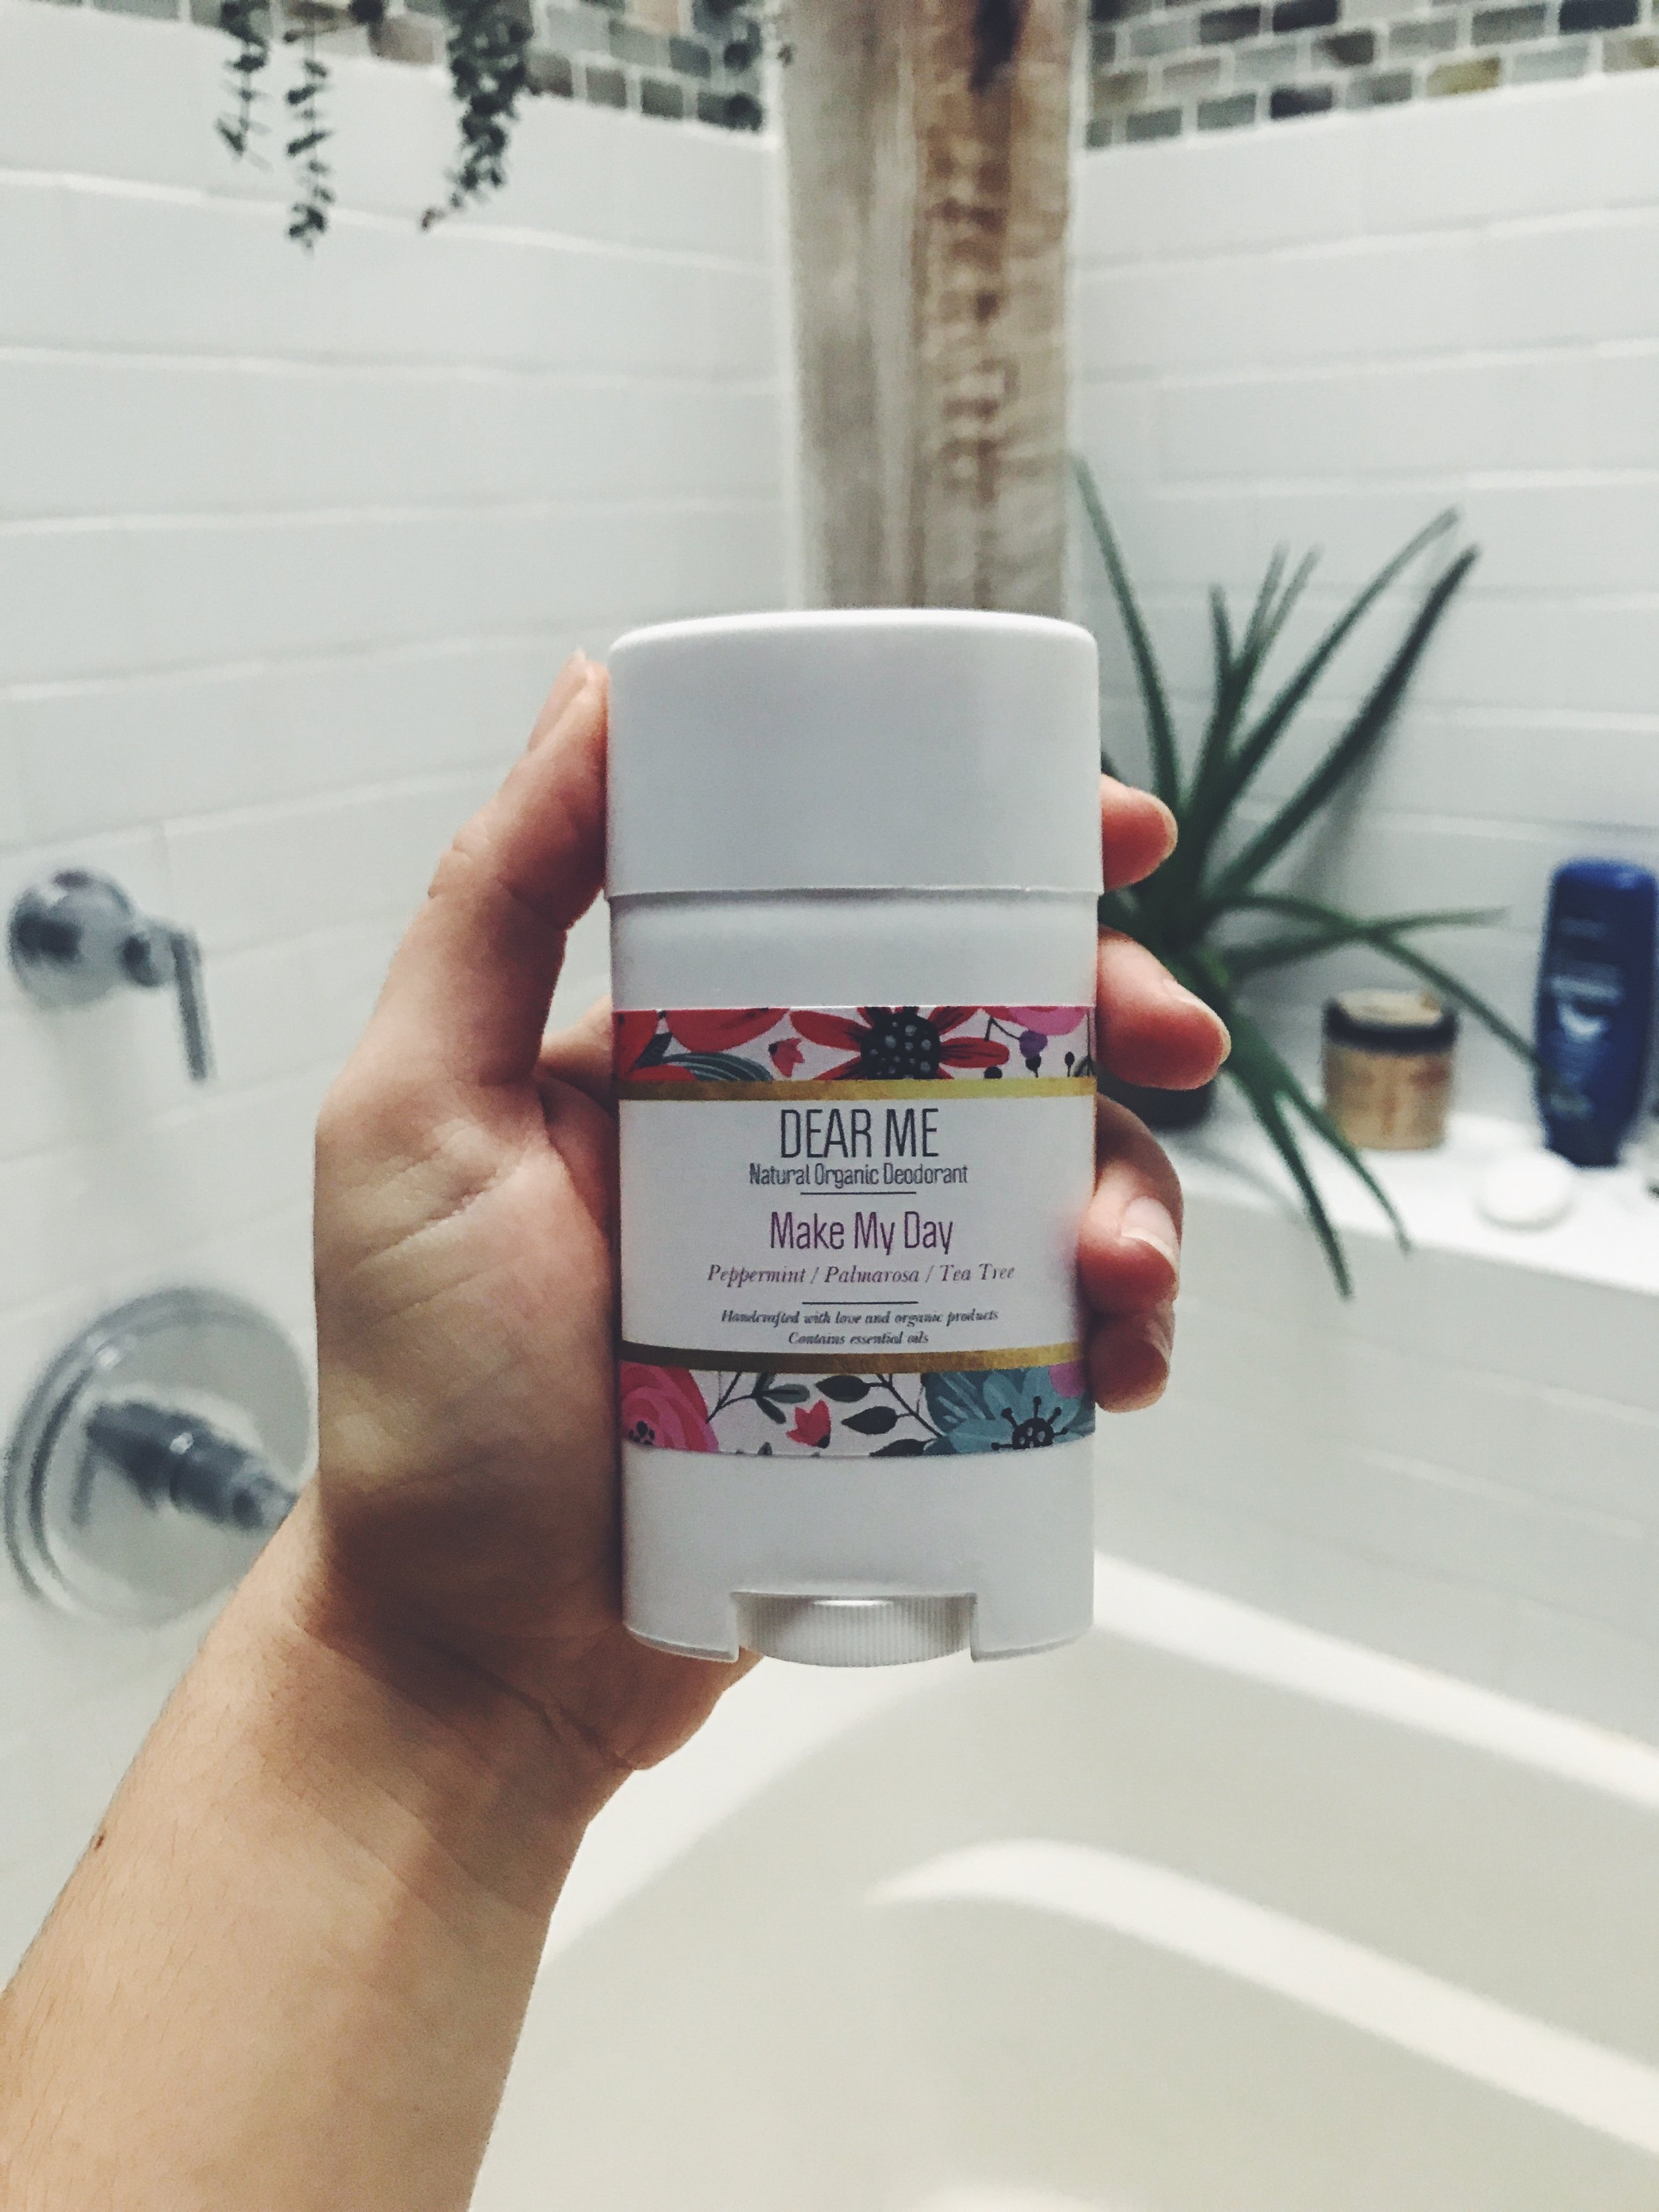
The second try was Dear Me Natural Organic Deodorant. I found them on Instagram and I decided to give it a shot. As of right now they have one scent blend called, "Make My Day". It smells great. This was really my first hardcore attempt at switching. I started with it at the beginning of March. It worked beautifully for the first month. I wasn't particularly sweaty or smelly! Success! Then at the end of April I brought it with me on my trip to South Africa. Let's just say my body had not transitioned to a warmer climate and neither did the deodorant. I was stinky. And it was a challenge. I returned home from the trip to warmer weather in Chicago, and the problem persisted. I was showering twice a day just to keep the pits stink-free. That being said, it definitely could've been the "detox" time period I had read about- when your body is expelling toxins and smelliness is increased for a while. I did also get some mild irritation and redness when I first switched, too. It went away though. BUT–I used it the entire time I was in yoga teacher training–and I felt like it held its own! 

Another random consideration, the first ingredient in Dear Me is coconut oil, which means at warmer temperatures it will melt. You can store in the fridge and get a refreshing cool feeling when you apply in the morning, but don't leave it in your beach bag. I really did like this deodorant a lot and it lasted me for about 4 months. I would definitely consider bringing it back for the colder months. Ingredients: Coconut Oil, Beeswax, High Quality Baking Soda, Arrow Root Powder, Peppermint Essential Oil, Palmarosa Essential Oil, Tea Tree Essential Oil
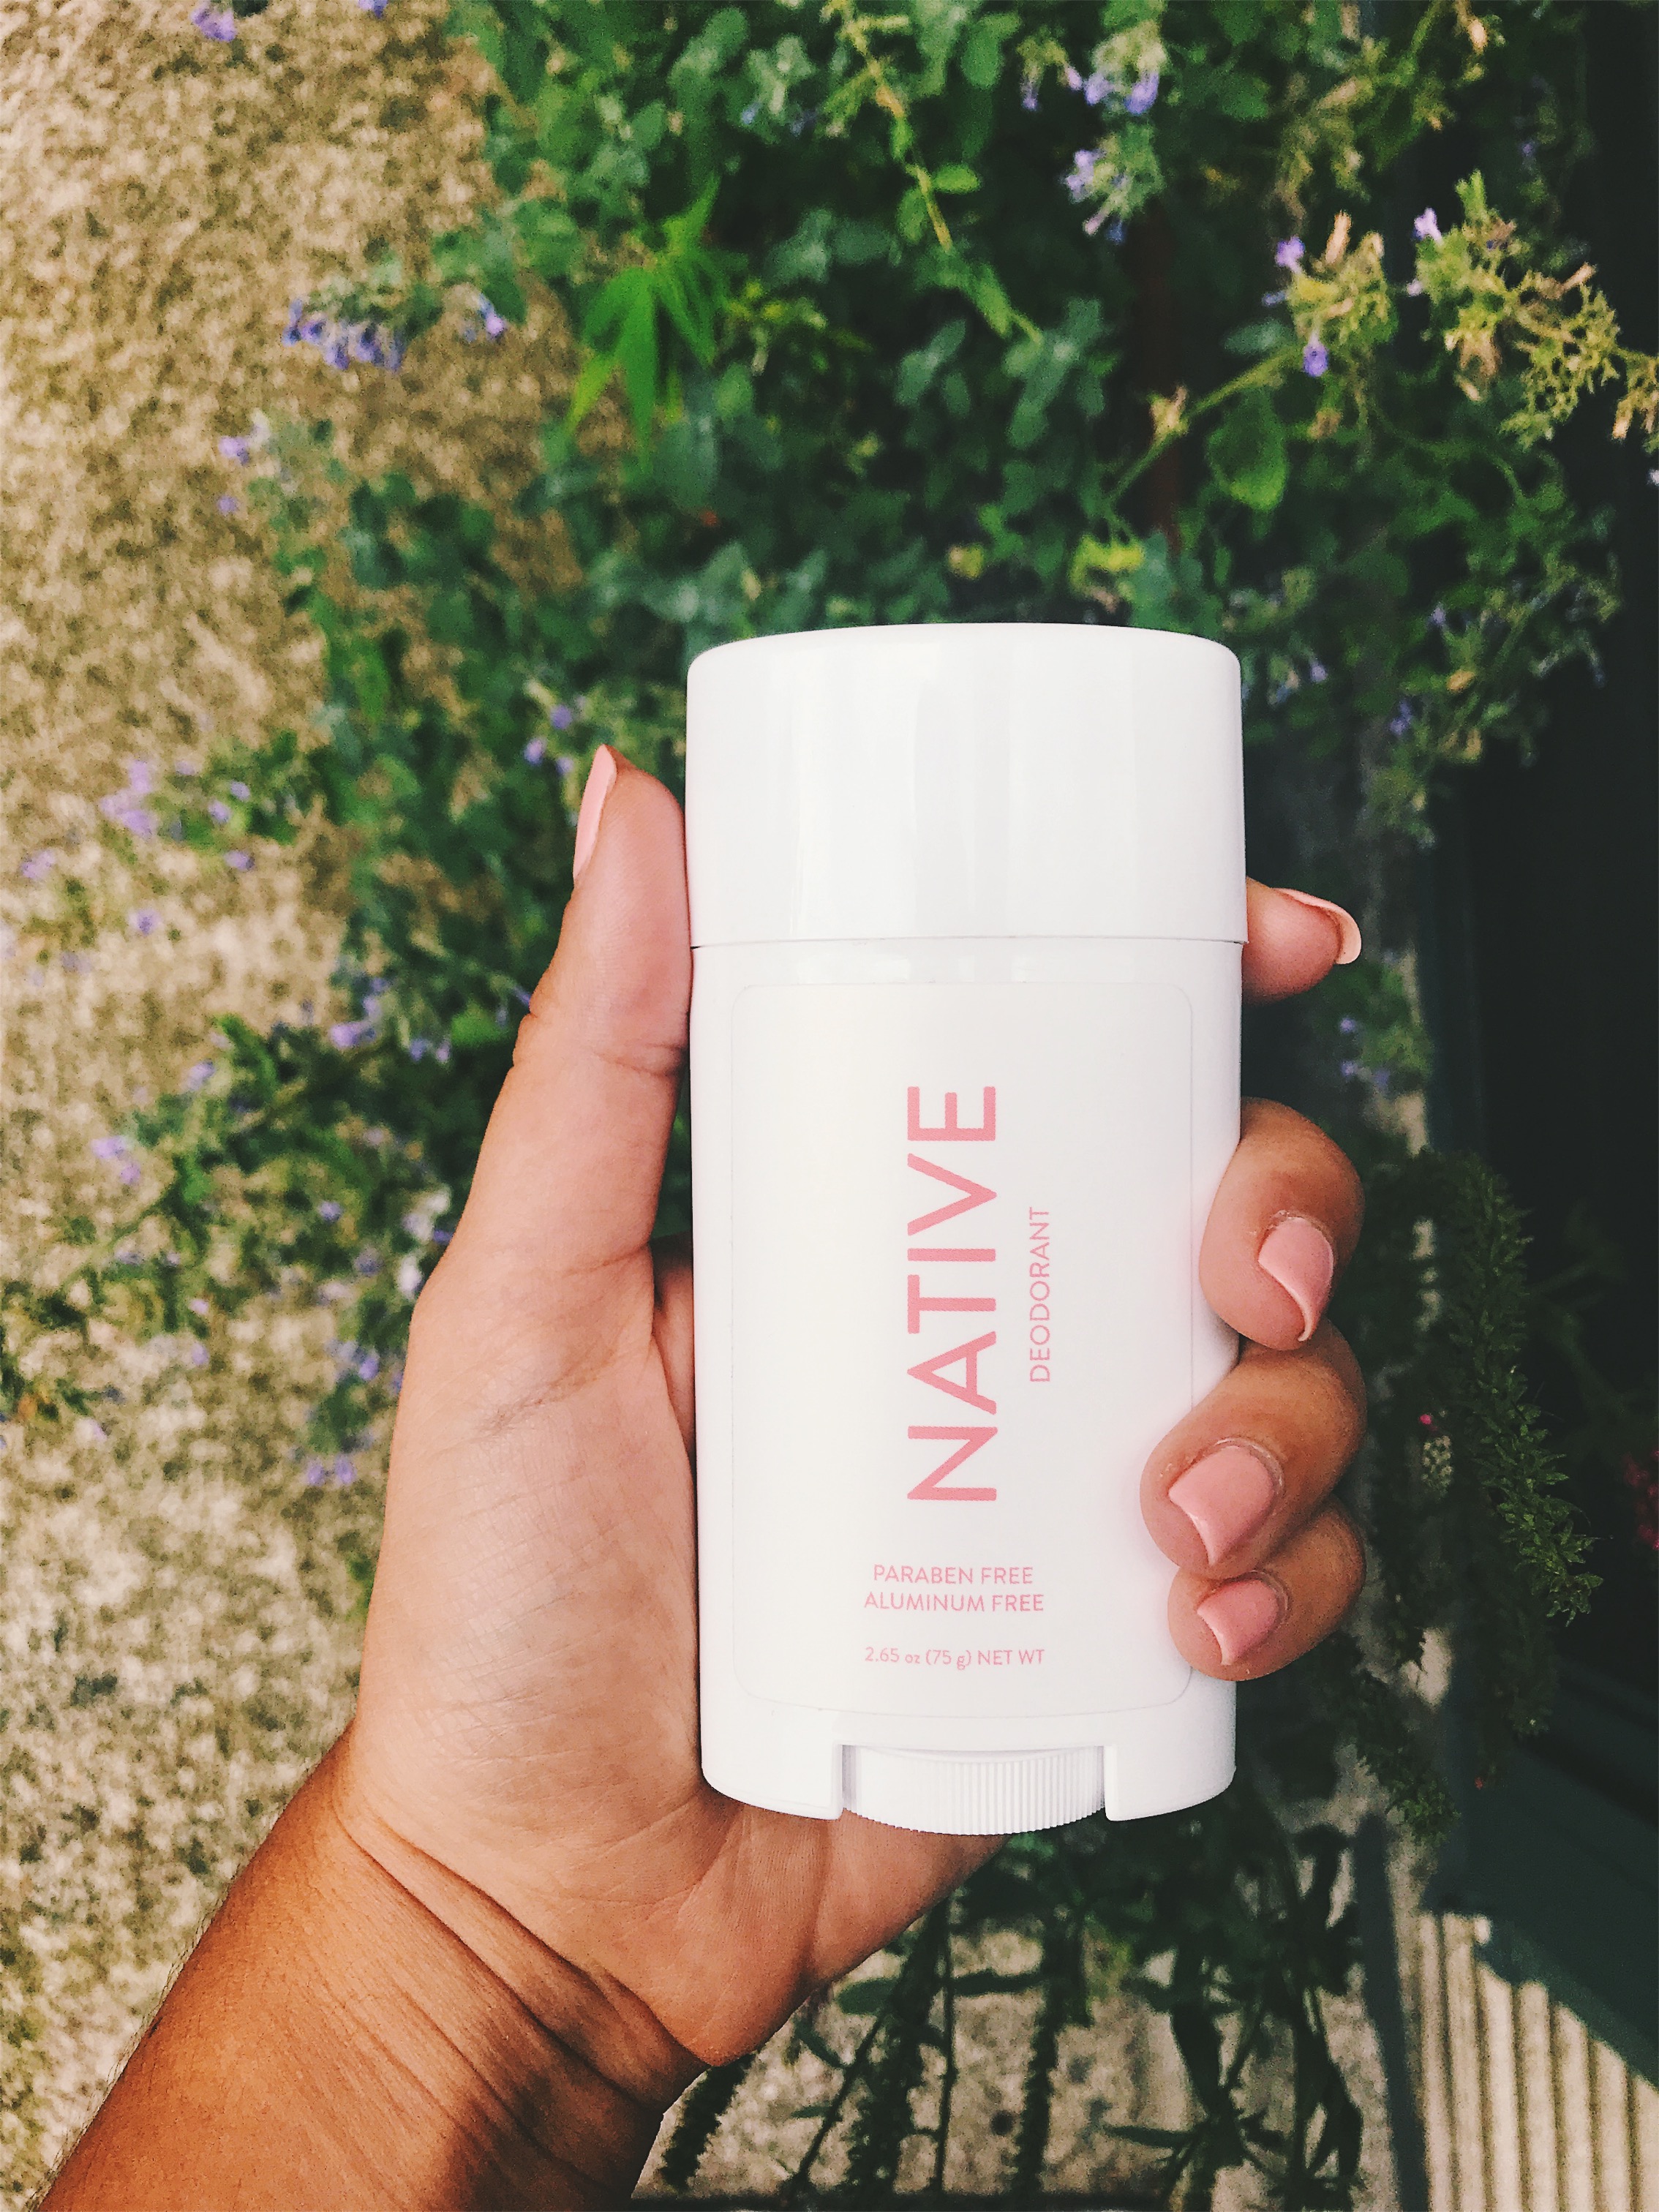
Option 3: Native

native natural deodorant switching to natural deodorant
Native natural deodorant ingredients aluminum free paraben free

For the last month I have been using Native deodorant. It is another stick blend. There are actually quite a few scents available- I opted for the seasonal blend, Rosé (duh). I also purchased a little mini of their bestseller, coconut & vanilla. It's a bit harder (doesn't use as much every application) than Dear Me, so I think it will last awhile. So far I really have liked it.  There are quite a few more ingredients in it- but it really works very well. I still am a lil' stinkier at the end of the day, so I reapply (and really scent is truly gone- it doesn't feel like I'm covering it up with perfume or something) or I shower before bed. Honestly, this is the first time I feel like life is business as usual since I switched to natural deodorant this winter. What I found super interesting is that they have a probiotic in their ingredients - L. acidophilus! I'm curious to know if by adding that bacteria it changes the dynamic of the smell. If any of you know the answer, please share! <3 Bonus- if you decide to try Native and use this link we both get a free mini-deodorant. Yes, pls! Ingredients: Caprylic/Capric Triglyceride, Arrowroot Powder, Stearyl Alcohol, Sodium Bicarbonate (Baking Soda), Shea Fruit Butter, Coconut Oil, Hydrogenated Castor Oil, Polyglycerol-3 Beeswax, Jojoba Esters, Tocopherol (Vitamin E), L. acidophilus, Dextrose, Glyceryl Caprylate, Glyceryl Undecylenate, Fragrance

The Outcome

My conclusion - there isn't a simple answer. The effectiveness appears to go up with the number of ingredients in the deodorant, but I would prefer a simpler blend. As of right now I am happy with Native, but I haven't ruled out trying the others again, or trying new blends. It's interesting because we all have different bacteria that thrives on our skin- so there is not one answer that works best for everyone! I would recommend trying out any of the options above to see how they work for you. I feel like I've finally become comfortable with using natural deodorant- my next mission is to get my husband to try it too! 


What to expect when you switch from a normal antiperspirant to a natural deodorant

Helpful tips for switching from Native!&nbsp;

Helpful tips for switching from Native! 

  1. It's not business as usual. Things will feel different under there. It takes time to get used to an increased level of perspiration.

  2. You may be stinkier for a period of time while you detoxify- or not. Some recommend doing an armpit detox mask. I didn't try, but perhaps would help eliminate the toxin stink period.

  3. Some natural deodorants may stain your clothes. I didn't notice this more so than my previous anti-perspirant, but it's good to be aware of.

  4. Shave your pits the night before to prevent irritation.

  5. Reapplying is your friend.


The Verdict?

So when is the right time to switch to natural deodorant? I don't believe there ever really is going to be a good time, but I would wait until after your wedding! Maybe even wait until you get home from the honeymoon. If you are ready to take the plunge, I would start at least 6 months before wedding. I think there are too many X factors. Pit stains on a white dress? Worrying about lifting your arms when dancing on your big day? Detox stink kicking in on your honeymoon? I would stick to what has worked for you in the past. Don't change anything up unless its not working! After the wedding passes you have your whole life to test out what works for you and your bod!


Have you tried natural deodorant? Did you make the switch before the wedding? Any brand recommendations to try? I would love to hear your thoughts! Leave me a note here or on Insta/FB. - AHS

Unbaked Brownies (Raw & Vegan!)

raw unbaked cacao brownies

I have a huge sweet tooth. Truly, I love dessert. But, as it is not in the best interest of my physical health, I try to avoid it. My opinion is that dessert is good for my mental health, so I have been searching for some healthy-ish dessert options. I found this recipe, originally by Chocolate Covered Katie. I made some adjustments based on ingredients I already had in the house. 

...and to be honest, I considered this endeavor a failure at first! While the flavor is amazing, the consistency was not great. Very crumbly. However, I shared these bites with friends and they still wanted the recipe! So I decided to share it. :) I think if you follow the original recipe, you probably will have a better outcome! 

My version used sunflower seeds instead of walnuts and honey in lieu of agave/ maple syrup. The original recipe looked way better. But mine were tasty AF. Especially the frosting! I could dive into a pool into this frosting. So, so, good!

These are a definite #treatyoself, so use them on your cheat days doing the SHED program, or as an occasional treat in maintenance! These may not be the best for your waistline, but definitely good for the soul! Leave me a comment on Instagram or Facebook if you decide to try them! -AHS


Photo by Chocolate Covered Katie

Photo by Chocolate Covered Katie

Ultimate Unbaked Brownies 

by Chocolate Covered Katie

(Makes 16 brownies)

Ingredients

  • 2½ cups loosely packed pitted dates
  • 1 1/2 cups walnuts
  • 6 tbsp cacao or cocoa powder
  • 1 1/2 tsp pure vanilla extract
  • 2 tsp water
  • 1/4 + 1/8 tsp salt
  • 1/4 cup cacao powder
  • ¼ cup pure maple syrup (or raw agave)
  • 2 tbsp vegetable or melted coconut oil
  • 1/2 tsp pure vanilla extract

Instructions

Combine the dates, walnuts, 6 tbsp cocoa, 1 1/2 tsp vanilla, water, and salt in a food processor. Process until completely smooth, scraping down as needed – It may seem dry at first, but don’t add any extra water.  Lightly grease an 8-inch square baking pan, or line the pan with parchment or wax paper. Transfer dough to pan and press very firmly until dough is evenly distributed in the pan. In a medium mixing bowl, combine remaining cocoa and vanilla extract with the maple syrup and oil. Stir until mixture forms a paste (this is the frosting). Spread evenly over dough in the baking pan. Refrigerate brownies for at least 2 hours, to set. Leftovers can stay covered at room temperature for a day, or up to 2 weeks in the fridge, or 1-2 months in the freezer.


Unbaked Brownies (Amended by AHS)

Ingredients

Unbaked raw brownies
  • 2½ cups loosely packed pitted dates
  • 1 1/2 cups sunflower seeds
  • 6 tbsp cacao powder
  • 1 1/2 tsp pure vanilla extract
  • 2 tsp water
  • 1/4 + 1/8 tsp salt
  • 1/4 cup cacao powder
  • ¼ cup raw honey
  • 2 tbsp melted coconut oil
  • 1/2 tsp pure vanilla extract

Instructions

Combine the dates, sunflower seeds, 6 tbsp cacao, 1 1/2 tsp vanilla, water, and salt in a food processor. Process until completely smooth, scraping down as needed – It may seem dry at first, but don’t add any extra water.  Lightly grease an 8-inch square baking pan, or line the pan with parchment or wax paper. Transfer dough to pan and press very firmly until dough is evenly distributed in the pan. In a medium mixing bowl, combine remaining cocoa and vanilla extract with the maple syrup and oil. Stir until mixture forms a paste (this is the frosting). Spread evenly over dough in the baking pan. Refrigerate brownies for at least 2 hours, to set. Leftovers can stay covered at room temperature for a day, or up to 2 weeks in the fridge, or 1-2 months in the freezer.


Spicy Taco Zoodles (Cookbook Preview!)

spicy taco zoodles healthy recipes shed for the wed

I'm giving you a preview from the soon-to-be released Shed for the Wed Cookbook today! There is a whole section dedicated just to spiraled veggie noodles. I love them! You get almost all of the satisfaction of a hearty pasta dinner without the refined carbs weighing you down.  Do you want to know the secret behind why they are so great? It's the sauce! If you have a good sauce, you do not miss regular noodles. Don't believe me? Try it yourself!

They key here is finding the right marinara. You want to make sure its lower in sugar (the guideline I go off of is 4g or less of sugar per serving). My favorite is Trader Joe's Organic Tomato Basil.  You most definitely can make your own, but it will add on a couple hours to the endeavor. 

I hope you give this recipe a shot! It's a real winner. Scroll to the bottom for the recipe. :)

Also, if you haven't downloaded the FREE food & wellness journal yet, be sure to sign up for emails from me and download it here! I love this freebie because it is what I actually encourage my clients to use! Use it to get a clear impression of your normal habits, and then you can transition to keep you accountable to your lifestyle goals! -AHS


Spicy Taco Zoodles

Serves 2

Ingredients

  • 1 tbsp olive oil

  • 1⁄2 lb ground turkey

  • Fajita seasoning (Simply Organic is a good brand)

  • 3 medium zucchini, spiraled*

  • 1⁄2 jar marinara sauce**

  • Optional: sprinkle of cheddar cheese

Instructions

Heat olive oil in a medium pan. Add ground turkey. Lightly coat meat with fajita seasoning and stir. Cook until browned. Mix in spiraled noodles and marinara. Serve with an optional sprinkle of cheddar cheese.

*If you don’t have a spiralizer, never fear! A box grater also works as well as buying them pre-noodled.

**Jarred marinara shouldn’t have more than 4g of sugar/serving.

spicy taco zoodles healthy recipes shredding for the wedding

Morning Rituals And Why You Should Have One (Especially When You Are Planning A Wedding!)

morning rituals gratitude journal erin condren planner superfood latte

I'm obsessed with having a morning ritual. Ever since I heard Tim Ferriss talk about them on his podcast I have been intrigued with getting mine right. It's a super important part of my day as an entrepreneur who works from home. It helps get my head right and start the day on the right foot. However, the more chaotic your life is, the more you could benefit from a strong morning ritual.  If you start your day off rushing through your shower and running to catch the train- you may need a morning ritual even more! When you are planning a wedding you essentially have taken on a second job. Having a morning ritual adds a bit of peace to your day - it's a win from the very first moments of the day. I think we all need that!

There are so many benefits to having a morning ritual, but of course it varies depending on what you include in it. What I love about my morning ritual is that I know I'm starting my day off doing something to take care of myself before the madness begins!

It is always a work in progress and it has evolved over time. I'm going to give you a couple examples so you can craft your own perf version! One that I used for a while is referred to as the "Miracle 6". It takes 6 minutes of your morning.

  • 1 minute of silence.
  • 1 minute of affirmations. 
  • 1 minute of visualizations
  • 1 minute of scribing (journaling)
  • 1 minute reading
  • 1 minute of exercise 

To break it down: 

The minute of silence is without your phone, eyes open or closed, just sitting for a moment int peace.

The affirmations are just a list of positive things to remind yourself of daily. They help keep your mind positive. Example of one: "Today I am surrounded by love and abundance in my life." I think about what I am struggling with overcoming mentally and then write some out, or google positive affirmations until I find what I need. :)  

The visualization is a form of goal setting, and it may take some time to write before your review it daily. You want to think about what you are hoping to achieve in your life. It could be long term or just a few months away. Think about what you are hoping to see in your life and write it down. Get as descriptive as possible, so when you read it, it evokes emotion and gets you excited! You should really see the vision clearly. 

Scribing is essentially journaling. There are many forms you could do. Some people do morning pages - a practice where you practice writing 3 pages of long form stream of conscious journaling (I tried it, it wasn't my cup of tea - but many, many people swear by it!). It also is hard to do in one minute. I preferred gratitude journalling, where I write 3 unique things I'm thankful for each day. 

I read this when I was practicing the Miracle 6 morning ritual- it was perfect in small snippets.&nbsp;

I read this when I was practicing the Miracle 6 morning ritual- it was perfect in small snippets. 

Reading- pretty self explanatory. If you are doing the Miracle 6 I think it's best to read something with small insights, like my favorite, Tao Te Ching. Or a personal development book (see right) where you can get something out of just reading a page or two. 

Exercise- again this is just one minute, so something like jumping jacks, crunches or push ups are good to get the blood flowing! Or you could take the yoga approach and do a sun salutation or two!

There were aspects of this routine I really liked, and it worked for me for awhile. But as I evolved, so did the ritual. When I added true meditation into my routine (not just a minute of silence), it changed the dynamic of the morning. I found it really hard to just read for one minute, and it kinda felt cruel to stop at one minute. Then I would read more, and then the routine would last much longer. I've taken some things I really liked from that ritual and incorporated it into my current routine. 

I've included my morning ritual is below. It is not my every day- right now I am at about 3 days/week. And sometimes I don't do all of the components, but if I get one of them done, it is an accomplishment!  


My morning ritual

  • I go downstairs and start the coffee. If I'm feeling really on it, I will use the frother and make a superfood latte (I froth almond milk, cacao powder, and brain octane oil). 
  • I then write in my gratitude journal. I write three things that I am grateful for.
  • Sometimes I will do a visualization and/or affirmations.
  • I pray for a few minutes. 
  • I meditate for 20-30 minutes. 
  • Then I get up, get dressed, and make my bed.
  • Boom! Ready to start the day!

a simple day with my gratitude journal and coffee.&nbsp;

a simple day with my gratitude journal and coffee. 

This process takes me about 60 - 75 minutes when I do all of the components. Sometimes a little more, sometimes a little less. 

If you have been following along, you probably understand how important coffee is to me. The smell tells me its time to start the day. When I have the superfood latte, I'm starting my day with nutrients that are fueling my body. Just one small step to start the day right. 

I love my gratitude journal because it really helps me cultivate an abundance mindset. I have so much to be grateful for every day.

Praying helps me focus on what truly matters and gives me perspective.  

Meditation deserves its own post. It helps me focus on the present moment. It helps me to be still in my world that is moving so fast. It helps me to just be. I will do a follow up post on meditation soon. 

I used to not make my bed. But now, I realize that making the bed (and keeping my space clean) helps my mind focused and clear. Besides that, it starts my day with accomplishing a task. There are so many things are out of my control, this is one small thing that is definitely within my domain. 

So in sum, having a morning ritual helps me to start the day: 

  • with good nutrition
  • in a positive mindset
  • at peace with what I can and cannot do
  • goal oriented
  • and accomplished

Pretty powerful stuff, right? All of those things are pretty critical during wedding planning! I encourage you to start your own morning ritual! The "miracle 6" is a great place to start.

Do you have a morning ritual already? I would love to hear about how you start your day! Leave me a comment below or on social! If you haven't seen I finally launched the Shed FB page. Go on and give it a like for me! xx, AHS

Gut Health 300

At long last, the practical final installment of the gut health series! This post is to help provide practical tips to increase probiotics and prebiotics in ya life to increase your gut/ overall health! Before you get started you may want to recap the previous posts in the Gut Health series. 


Probiotics

Here are some of the easiest ways to add healthy bacteria into your gut! 

  1. The easiest way to get more probiotics in your life is to take a probiotic supplement. For more info on how to pick the right one - read Gut Health 200. However, they are expensive, and if your gut is already in good shape, it may not be necessary to continue long term. I always advocate to try to get the bulk of your nutrients from whole foods, and here is no different. 
  2. Lean in and switch to the 'booch instead of soda. Kombucha - you've probably heard of this bubbly, magical drink. It is actually fermented tea, and is an awesome way to get more good bacteria in your life. Make sure you find brands that keep the sugar to no more than 4gs per serving. Bonus, if you are hooked on soda- it is a great substitute!
  3. Add more fermented foods into your life! Fermented foods such as kimchi (the national food of Korea! A spicy pickled cabbage dish) or sauerkraut (European origin pickled cabbage dish) are #shedapproved and are loaded with the good stuff. This is particularly good in the winter when fresh produce is less available (or historically was less available! That is how people would stay healthy all year round!). While Kimchi is not available everywhere, you can opt to go to a Korean mart and they are typically sold there. Many grocery stores sell sauerkraut. If those aren't in your neighborhood you can always make it yourself (Links: How to make easy kimchi at homeHow to make sauerkraut in a mason jar).  
  4. Greek yogurt (or Siggi's Icelandic style) and kefir are Month 1 #shedapproved and a great source of good bacteria. You know that watery stuff that sits on the top of yogurt? Don't pour it out or avoid it- that's where the healthy bacteria live! Be sure to mix it in fully! My one warning here is to avoid added sugar in your yogurt/kefir. Better to get the plain, full fat versions and add your own berries and honey! 
  5. Beer and Wine! Whaaaaat? Alcohol? Yep. The catch? Commercial beer is rigorously filtered and won't have the health benefits. Just another reason to try home brew! Also, don't overdo it. It negates the health benefits! Stick to one beer or glass of wine at a time (2 tops!) to maximize the benefits and prevent weight gain!  

prebiotics 

Prebiotics keep the good gut bacteria happy and healthy! Because they need food too! The key to making gut bacteria happy? FIBER!!

  1. Freeze pre-ripe (lightly green still) bananas to add to your smoothies. You don't notice the flavor/texture difference as much as if you just ate them outright. Bonus - there is less sugar in these nanners so they are better on the waistline!
  2. Raw dandelion greens salad with raw asparagus (see recipe below!). Refreshing, light, crunchy, and yummy!
  3. Jicama chips (I mean fries. I swear I don't know where these Britishism are coming from)! So refreshing in the heat of summer. Check out the recipe below! 
  4. GG crisps/crackers. Month 1 Shed approved and LOADED UP with fiber. Be sure to look for the ones with psyllium husks (pumpkin and sunflower seed versions have this) on the ingredients list for gut friendly bonus!
  5. Any other fruits and veggies you like. The key here is the fiber, so leave the skins on (where you can - ie cucumbers, apples, etc) and eat up all the pulp you can! 

Here is a list of some of the top prebiotic foods not included above: 

  • Raw chicory root - the top source, with almost 60% fiber
  • Raw Jerusalem artichoke 
  • Raw garlic
  • Raw leeks
  • Raw onions 
  • Cooked onions
  • Whole wheat 
  • Legumes

This is by no means an exhaustive list, it's more of a prompting to get some new healthy eats in your routine! I hope you found the Gut Health series educational and beneficial. What are you going to do to add more gut friendly foods into your routine? Leave me a comment here or on Instagram! - AHS


Mexican style raw Jicama fries 

jicama fries chips mexican style tajin gut health prebiotics

Ingredients

  • 1 jicama
  • Extra virgin olive oil (start with a tbsp, add as necessary)
  • Tajin* or other chili lime seasoning blend to taste

Instructions

Peel jicama with a vegetable peeler. Cut into "fry" shape. I made mine a bit thicker. Coat lightly with olive oil and Tajin. Eat immediately for a filling snack and/or appy!

*Tajin is a Mexican spice blend that is amazing on fruit- it's incredible on watermelon too! You can order off amazon or get it at your local Mexican store if there is one close to you! You can also make this gringo style with paprika, onion powder, and chili powder.  


Dandelion Greens Salad

(adapted from the SHED program) (serves 1) 

This salad is an amazing summer detox salad and gut health booster! 

Ingredients

  • 1⁄2 apple, chopped (skin on!)
  • 1 fennel bulb, sliced
  • 2 cups dandelion greens
  • 3 spears of raw asparagus, chopped into 4 bites pieces
  • Salt and pepper to taste
  • 1⁄2 tbsp balsamic vinegar
  • 1 tbsp extra virgin olive oil
  • sprinkle of parmesan (optional)

Instructions

Mix ingredients in a bowl and enjoy a crunchy gut healthy lunch! 

Berry Banana Smoothie Bowl

shredding for the wedding berry smoothie bowl

It's officially summer and I am feeling all of the summer vibes. During the colder months, it is much harder for me to enjoy smoothies and/or smoothie bowls. I crave warmth. But when that sunshine hits, I want allll of the refreshing smoothies. Which sometimes can get boring, which is where smoothie bowls come into play. I love to start my day packed with phytonutrients, extra superfood boosts (because summer is all about that glow!), and something else to get me out of my "egg rut" (if you follow me on instagram - you know that I eat way too many eggs!). This beauty is in the Shed cookbook debuting next month! I thought it would be fun to give you a sneak peek! Happy summer and enjoy the gorgeous sunshine!! - AHS


berry banana smoothie bowl

shedding for the wedding berry banana smoothie bowl lose weight for wedding

Ingredients

  • 1⁄2 frozen banana

  • 1⁄2 cup of frozen berries (I used a mixed berry blend)

  • 1⁄3 cup vanilla plant-based protein powder

  • 1 tbsp flax seeds

  • Unsweetened vanilla almond milk

Topping Options

  • chia seeds (shown)

  • bee pollen

  • gogi berries

  • acai berries

  • fresh berries (shown)

  • coconut shreds (shown)

  • sliced almonds

  • pepitas (shown)

  • low sugar granola

  • cacao nibs (shown)

Instructions

Combine all ingredients, using less liquid than your normal smoothie. Blend. Pulsing until it creates a thick ice cream like consistency. If necessary, add more liquid, but try to keep a thicker consistency by using less.  If you are unsure of where to start with the amount of liquid, just add a little bit and pulse, slowly adding more until it actually blends. Note: Pick one topping initially to keep it economical — eventually working any and all of these into your smoothies/ bowls to add great health benefits. 


Update 7/2/18: the original post did not include that the banana and berries be frozen! Whoops! You would have one warm smoothie bowl without them being frozen! :)

Put a little (self) love in your heart...

When I look at the pose above, I first think to myself, "Woof, those calves. And I have a long way to go to make this pose look good!" It takes me a moment to reset and appreciate how far I've come and appreciate that tan instead!

When I look at the pose above, I first think to myself, "Woof, those calves. And I have a long way to go to make this pose look good!" It takes me a moment to reset and appreciate how far I've come and appreciate that tan instead!

When you look in the mirror what do you see? Sometimes I see circles under my eyes. Sometimes I see bloat from last night's pizza (yep- I eat pizza!). Sometimes I see a whole lotta thigh. Rarely when I look in the mirror am I like, "damn that's a fine looking lady in there!" But why don't I? I suspect I am not alone in this. 

There are probably a lot of contributing factors, and I do not want to diminish them - but I will focus on two reasons for the purpose of today's note. The first is comparison. A natural human tendency that has been magnified by the omnipresence of social media. We spend our days longing for what other people have- their banging bodies, their DREAM weddings, their perfect husbands, adorable babies, charming houses, fancy cars, and exotic honeymoons. We spend a huge bulk of time assessing other people's lot in life and comparing ours to theirs. This isn't to say that we dwell on it or it takes over how we live our lives (sometimes yes, sometimes no) but regardless it happens on the daily. Sometimes we know we are doing it, other times it is operating in the background - but still happening. 

The second reason is judgement. Comparison feeds judgement. Example, so-and-so buys a beautiful new home – "But who would want to live there? It's the middle of nowhere!" Someone posts a selfie - it's attention seeking and/or desperate. Someone cuts you off on the highway - they are an a**hole. Immediately we affirm our own choices and lifestyle, building our own ego at the sacrifice of tearing down someone else. We judge other people and ourselves ALL of the time for EVERYTHING. And that includes what we see when we look in the mirror. 

And it's exhausting. 

And it doesn't serve us.

And in fact, it has a negative effect on the way we view ourselves and others. We need to knock it off. 

Less judgement, and more love. 

We need to love ourselves. Seriously, love every part of ourselves. We need to cut out the negative self talk. We are KWEENS ladies! And stunning rays of light filled with love. We are pure magic. When we acknowledge this, it helps us to see that in everyone else. 

Today is #internationalyogaday, and with it, comes a challenge. Love yourself and then love others. That's our mission. But how to shift our mindsets? It's a big task, so let's break it down.  


Step 1. Acknowledgement

Sit with a journal and a cup of (insert beverage of choice) and do some self reflection. When do you tend to compare yourself to others? Is it comparing that bling on your finger to your friend's? Does it happen when you look in the mirror and you think about the Instagram model you follow? When do you tend to judge? Does it manifest in road rage? Again, is it social media? Your favorite Bravo TV stars? 

Just take the time to think about how comparing and judging show up in your life. If after reflection you truly do not compare or judge, please teach a class and invite me! 


Step 2. Forgiveness

The next step is to forgive yourself and forgive others for being this way. We have to absolve ourselves from this. These habits are ingrained from childhood and perpetuated by the culture we live in. Let's not beat ourselves up over being judgmental. That defeats the purpose of this whole exercise. 


Step 3: Radical acts of self care

How did we get to self care? Well, what is at the heart of comparison? I believe it's our own feelings of inadequacy. Showing yourself some care is the foundation of self love. Do something for yourself every day. Take time for yourself. Whatever that means for you. By caring for ourselves, we nurture self love. It helps us to live more comfortably in our own skin- which helps us to love others better, too.

Self care is not selfish.

I repeat, SELF CARE IS NOT SELFISH. When you are feeling drained and out of gas - it is really easy to get into negative self talk patterns. Beyond that, it also hinders our ability to serve others. So take the time to refuel. It is so important for your mental and physical health. Don't know where to start? Take a break from wedding planning and try some of the suggestions below:

  • Spend quality time with loved ones.

  • Buy a coffee for a homeless person.

  • Take a bath.

  • Laugh. Really hard.

  • Watch trashy tv, or whatever gives you joy.

  • Bask in the sun.

  • Dance by yourself.

  • Get a mani/pedi.

  • Do nothing - guilt free.

  • Do something you have wanted to do for a long time, but never had the time.

  • Go for a walk in nature.

  • Read a book.

  • Take a nap.

  • Exercise (in a way that sparks joy!).

  • Call a friend.

  • Look in the mirror and tell yourself that you are beautiful.

  • Meditate.

  • Take a social media/technology hiatus.

  • Eat a hearty nutritious meal.

  • Eat whatever you want, and without judgement


Step 4: Judgement Detox

Now that we have acknowledged our habits, forgiven ourselves for them, and have built up our self love... it's now time to take a break from the judging. This is really, really hard - because it is ingrained so deep. And it's not always showing up the way you would think. For example, today I was trying to back into my garage, and a neighbor had left what I think was an air conditioning unit outside their door, which prevented me from getting in my usual way. I was so annoyed. I was thinking about how inconsiderate that action was. Why didn't they move it to the side? Was this a handy person or was it the neighbor? Someone doesn't know the protocol... Judgement after judgement after judgement. And then I stopped myself. I realized, it was highly unlikely that they even realized it inconvenienced anyone. THEN I realized, I manage to get into my spot, just fine. I spent 2 minutes thinking they were horrible people, and realized I worked myself up over absolutely nothing. 

And this story isn't rare. I'm sure I do this 10x a day.

Your mission, should you choose to accept, is to spend one day completely judgement free. Only loving thoughts towards yourself and others for just one day. That doesn't mean the judgements won't arise, but do your best to quash them when they come. AND double whammy, when they come up- don't judge yourself for having the thoughts! 


In summary

The world we live in is full of judgements. By giving ourselves some self care, and by choosing to judge less, we will love ourselves and others more! Yoga reminds me to have a beginner's mind, love and accept myself where I am at, and to love others unconditionally. I hope that through reading this post and doing this exercise, it helps you do the same. 


Are you going to participate in the self care and judgement detox challenges? I would love to hear if you participate and how it went! Use #shedselfcare and #shedjudgementdetox so I can see! -AHS

GF "Breaded" Chicken Thighs AKA "The Best Chicken I Ever Made"

gluten free breaded almond meal chicken thighs

I was messing around in the kitchen last week, and was craving a breaded-style chicken. I had unopened almond meal in my cupboard, and voila, I came up with "The best chicken I ever made" - according to my husband. I served it on a cauliflower rice stir fry. Which was a random throw together of cauliflower rice, frozen broccoli and bell peppers, powdered ginger, paprika, liquid aminos and a dash of rice vinegar. The combo was amazing! "Breading" the chicken took an extra 5 minutes of prep compared to my usual go-tos, and it was worth it! 

The set up is easy enough! One bowl for egg and one for almond meal.&nbsp;

The set up is easy enough! One bowl for egg and one for almond meal. 

Have you ever heard of engagement chicken? It's this recipe that every time a woman makes it for her boyfriend she finds herself engaged shortly thereafter. I'm not crazy about the premise of the story, but I feel like this recipe would bear similar results. 😂😂

So without further ado, recipe below! I hope you guys try it. If you do, leave me a comment below! - AHS


almond meal chicken thighs breaded gluten free

Gluten Free "Breaded" Chicken Thighs aka "The Best Chicken I Ever Made"

the best chicken i ever made gluten free breaded chicken thighs

Ingredients

  • 5 chicken thighs 
  • 1 egg, whisked 
  • 3/4 cup almond meal
  • Olive oil spray 
  • Herbs de Provence 
  • Salt and pepper 


Instructions

Preheat oven to 375 degrees Fahrenheit. Grease baking dish with olive oil spray.  

Dip chicken thighs on each side in egg. Batter with almond meal. Add to baking dish. Gratuitously add herbs de Provence, salt and pepper. (Note: You could mix the herbs de Provence in the almond meal mixture, but it turned out great just sprinkling it on top.) Some almond meal will come off where you grab the chicken. I just sprinkled those spots with more almond meal once they were in the baking dish. 

Cook for 40 minutes or until inside temperature reaches 165. I recommend using a meat thermometer - every oven is different, and you don't have to worry about overcooking your chicken for safety. :) 

Serve warm, but it's great cold for lunch the next day too! 

Wellness Hack: Frozen Foods

Wellness hack benefits of frozen food

Today I decided I needed to share with you my biggest wellness secret...FROZEN FOOD. Yeah, I said it. Frozen. Food. I'm not talking about old school TV dinners, I'm talking about REAL food, just frozen. 

How is this a hack, you say? Because it seriously keeps me on my game. It's an excellent tool to keep in the Shedding toolkit. Here's why: 

1. It helps you SAVE money!

If you are buying plain frozen veggies, many times they are less expensive than buying fresh! I know, it's crazy! Most of the frozen vegetables I buy are not more expensive than if I bought them fresh. Don't get me wrong, fresh is great, but not necessary for every meal! 

Also, when you have food that is at it's peak ripeness, and you know you won't have a chance to use it before it goes bad? Throw it in the freezer! Say no to food waste! 

2. You don't miss out on any nutrients

How? Doesn't freezing destroy the nutrient value? Actually, in most cases it preserves the nutrients! Most frozen foods are flash frozen at the peak of ripeness when the nutrients are prime for the eating! A lot of time food travels thousands of miles to get to its destination. During this time, many fresh fruits and veggies lose some of their prime nutrients. This is also why shopping local is best! :) Who knew frozen could even be better for you than fresh?!

3. You are always prepared! 

So if you are like me, and are never home OR if you are planning a big trip- frozen food will save you when you come home. Let's say you get back late and have to get right back into a crazy work week upon arrival? No time for the grocery store? No problem! You have all the fixins for a stir-fry or a burger in your freezer!

4. You save time! 

No chopping, washing, trimming or peeling for you! If it's frozen, it's ready to go! This turns an hour long meal prep into 30 minutes. And who doesn't love that?


Here are some of my favorite frozen foods and foods to freeze! 

  • 3 minute microwavable packages of brown rice. These are my absolute favorites. I mostly use them in buddha bowls or stir-frys. Also great for soups too! 
  • When I'm going on a trip I buy enough meat for 2-3 weeks and storing anything I won't use that week in the freezer. Chicken and ground turkey are my go-tos, but even bacon works! Meats defrost beautifully if they aren't in there too long! 
  • Frozen shrimp- I buy cooked and uncooked. When I'm really tired it's great to have cooked shrimp ready to go for a pasta dish. 
  • 2 ingredient frozen turkey burgers. So easy, so healthy. What's not to love! 
  • Trader Joe's has an Organic Quinoa, Kale, Sweet potato, Carrot bowl thing that is an easy meal when you are not in the mood to cook. 
  • Frozen riced cauliflower- I use this instead of brown rice to lighten the carb load when I need a lighter meal! 
  • Broccoli florets- I pretty much could use these in any dish. 
  • Bell peppers- Same as above. 
  • Frozen berries for dessert- I love to eat these whole in the Winter. It's almost like eating ice cream. My favorites are cherries and blueberries. 
  • I love throwing overripe fruit in the freezer for smoothies. You could also throw them in with cottage cheese or use them in chia puddings! 
  • Spiralized veggie noodles - easy peasy ready to go! 
  • Frozen shelled edamame - another #shedapproved snack


What do you guys think? Into frozen food or not about it? I'm also curious to know what else do you freeze? I am all about expanding my frozen food repertoire – I would love to hear any of your tips for me! 


Superfood Profile: Bee Pollen

benefits of bee pollen superfoods natural allergy prevention

In honor of allergy season being in full swing,  I thought it would be helpful to provide some insight on Bee Pollen and why it is so extraordinary. 

I had my first experience with bee pollen a few years ago. I was working at a local juice and smoothie shop- and we offered bee pollen as an added superfood boost. I would put it in my smoothie every day, and I swear I never had a spring so unaffected by allergies. Knowing this information and how it affected my own system inspired me to learn more, especially as future years sans bee pollen were quite miserable. 


what is Bee pollen? 

Bee pollen comes into existence when honey bees harvest pollen from a variety of plant sources. The bees add their own goodness (nectar) into it, and store it in honeycomb. Through this process it becomes a bonafide complete superfood. It has amino acids, essential fatty acids, vitamins, minerals, and more! It's pretty incredible. It is not considered vegan because bees create it- however, no bees are harmed in the harvesting of the pollen. 


You've probably heard of pollen as an allergen itself, so why would eating it be good for you?

Essentially the thought is that it helps your body build its immune response to pollens. If your immune system is prepared, you will experience less symptoms once allergies are in full swing. This is also why buying local bee pollen is the best if you would like it to help with your seasonal allergies. When you use local bee pollen, the bees are harvesting pollen from plants that likely will be your triggers later. 


If I want to prevent allergies, when should i start taking it?

It's best to start a few months in advance to build up an immune response. So probably too late to save you this spring. You can start next month to prepare for autumn allergens, though! That being said, I've noticed a difference with one dose (probably placebo effect but hey, I'll take it!) - so I will still be taking it this spring, even though it's late in the game! 


I don't have seasonal allergies, why would I want to add this to my routine?

Key word: SUPERFOOD. This stuff is amazing. I mentioned its a complete food, so it essentially is a natural vitamin supplement. Here are some of the many reported benefits: 

  • Reduces inflammation
  • Protects against liver toxicity
  • Improved energy levels 
  • Improved gut health 
  • Acts as an anti-oxidant
  • Natural stress reliever
  • And many more! (Want to learn more? Check out "Further Reading" at the bottom of the page)

What to look for when buying 

As mentioned before- first and foremost- try to get it locally. I live in Chicago- but farms in other areas of the state or in southern Wisconsin, Michigan, and northern Indiana all would probably be fine because we all share similar Midwest weeds and plants. Check with your local farmers market or try Whole Foods, they often will try to use local vendors. 

Next, it's great to find kernels with a variety of color. They range from yellow to black - depending on what plants the bees took the pollen from. It you have a diversified mix it will help cover you to a variety of plant allergens. 

It comes in a variety of forms (capsules, liquids, etc.) but get the whole kernels. Less processing is always best! 

Side note: there are a lot of similar benefits to eating raw organic honey, however, it is really hard to find unpasteurized honey. The pasteurization process kills off a lot of the beneficial nutrients. Bee pollen on the other hand, not being a liquid, does not get pasteurized, so it retains it's nutritional integrity better. 


How to best eat it? 

My preferred method of ingesting :)&nbsp;

My preferred method of ingesting :) 

I prefer using kernels on top of my smoothie bowls or mixed in to a smoothie (post blend). Always eat it with other food. If added to fruit it is supposed to activate quickly in the gut!

If you have any serious allergies (I'm talking anaphylaxis) ESPECIALLY to pollen, talk to your doctor about ingesting bee pollen. If you are worried you may have an allergic reaction, you can test by putting one granule on your tongue until it dissolves. If there is no reaction, add another. Repeat until you feel confident you will not have a reaction. 


Further Reading

Want to learn more? Check out these resources!

How Bee Pollen Could Cure Your Allergies - Mind Body Green

Top 8 Bee Pollen Benefits - Dr. Axe

Top 10 benefits of bee pollen - Be Healthy


What do you think? Will you give bee pollen a try? I am definitely going to add it back into my routine! Happy June! - AHS